Showing posts with label food. Show all posts

Friday, February 18, 2011

Siphon Coffee Brewing and Hazelnut Cinnamon Biscotti


Apparently when I was a kid, I thought that coffee was the last socially acceptable addiction, but thanks to a recent obsession (see also: dub music), now I get why.


One of the joys of living near the west coast hot spots is that the guys (it's always guys) who are into coffee take it to a flat-out ridiculous level of obsession. I went to Stumptown Annex in Portland last week, and while checking out their bean selection, I casually told the counter guy that I was just getting into coffee and was interested in knowing more about the broad flavor trends between the big global coffee-producers (Central America, Southeast Asia, Africa). Lord love him, but he was totally incapable of dumbing it down for me. He said that making those kind of generalizations would be like asking what "wine from Europe" was like.


So I'll be the first to admit that I don't really know anything about coffee: up until a few months ago, I didn't really drink much coffee at all. All that changed with the first cup of coffee I made with my siphon brewer (which I found, new in the box, at the Boise flea market for $10).


I'll admit, even if I didn't I love the process -- like my friend Trey says, it's coffee theater -- and appreciate the fact that it's a great justification for indulging my love for scientific glassware, brewing coffee this way would be a waste of time if it didn't make super good coffee. My little Hario didn't disappoint.


I could never explain the process as well as the impressively-produced little video below, but the point is that the water in the brewing chamber never reaches the boiling point, so most of the bitter compounds stay in the coffee. The result is a bright, floral flavor with lots of salty, caramel-y body. I just tried an Ethiopian varietal from Stumptown that actually tasted like raspberries. Another varietal from Kenya is described as having "notes of kiwi, cocoa, pineapple and raw sugar in a cup redolent of dried flowers."


Is it all psychosomatic? Why would it be for coffee and not for wine or scotch? Admittedly, all these flavors are really subtle (it is black coffee, after all) but the fact that I can taste even one or two of them is pretty exciting. And, my brewer and hand grinder are both from Japan. The New York Times would be proud. Next, I wanted to bake something to complement my labor of love, and guess what? Biscotti go really well with coffee!


This recipe from Baked is basically perfect. Warm cinnamon, creamy hazelnuts, semisweet chocolate, and black coffee? I made another recipe alongside these (white chocolate and dried cranberries with semolina flour), but they were so sad next to the world's best biscotti that I couldn't muster up the heart to take any good pictures of them. My best advice when making these is to use plenty of parchment paper. A paper sling makes transferring the dense dough much easier.


Hazelnut Cinnamon Biscotti
    Ingredients
  • 1 1/3 c sugar
  • 1 1/4 tsp baking powder
  • 1 1/4 tsp salt
  • 1 tsp cinnamon
  • 4 large eggs
  • 2 tsp vanilla extract
  • 3 1/4 c AP flour
  • 1 1/2 c blanched hazelnuts, toasted
  • 1 3/4 c (10 oz) semisweet chocolate chips
  • 1 egg white
    Directions
  1. Preheat the oven to 350 degrees F. Line a baking sheet with parchment paper.
  2. In a small bowl, whisk together the sugar, baking powder, salt, and cinnamon.
  3. Beat the eggs and sugar in an electric mixture until the color is uniform and the mixture thick. Add the vanilla and beat for 5 seconds. Add the flour in two batches and beat until just combined. Scrape down the bowl, add the hazelnuts and chocolate chips, and beat until just combined.
  4. Turn the dough out onto parchment paper. Use a dough scraper to form into a log about 16" long, 3 1/2" wide, and 3/4" thick. Smooth the top with an offset spatula. Bake for 20 to 25 minutes until firm but not browned. Cool for 10 minutes.
  5. Lower the oven to 325 degrees F. While the log cools, whisk together the egg white and 2 Tsp of water and apply the egg wash to the top of the dough with a pastry brush.
  6. Cut the log into 3/4" slices with a serrated knife. Lay the biscotti on a parchment paper-lined baking sheet, cut side down, and bake for 25 minutes. Cool completely on a wire rack.

Monday, December 20, 2010

Jam Sandwiches


I have a confession to make -- I don't really like Christmas cookies. I love cutting them out, decorating them with my mom and sister, making the goopy colored frosting, but at the end of the day, they taste like straight butter and flour. I had given up on Christmas cookies until, on a whim, I opened up my Baking Illustrated cookbook and, lo and behold, I found the greatest Christmas cookies of all time: jam sandwiches.


It turns out the secret ingredients for the perfect sugar cookie are a) superfine sugar, b) two sticks of butter, and c) cream cheese. As always a stand mixer takes all of the guess work out of making these, and liberal use of parchment paper makes rolling/cutting/cleanup incredibly easy. Be sure to refrigerate the dough in between steps and to eat one of the cookie holes right when it comes out of the oven. I think I've found my favorite cookie recipe ever.


Jam Sandwiches
    Ingredients
  • 2 1/2 c (12 1/2 oz) AP flour
  • 3/4 c (5 1/2 oz) superfine sugar (granulated sugar, pulverized in the food processor for 30 sec)
  • 1/4 tsp salt
  • 16 Tbsp (2 sticks) unsalted butter, softened but still cool, cut into sixteen 1/2" pieces
  • 2 tsp vanilla extract
  • 2 Tbsp cream cheese, at room temperature
  • 2 Tbsp turbinado, Demerara, or white decorating sugar
  • 1 1/4 c (12 oz) raspberry jam, strained
    Directions
  1. In the bowl of an electric mixer, mix the flour, sugar, and salt at low speed until combined. With the mixer running on low, add the butter a piece at a time. Continue to mix until the mixture looks crumbly and slighty wet. Add the vanilla and cream cheese and mix for another 30 seconds.
  2. Knead the dough by hand in the bowl for a few turns, then turn the dough out onto the countertop. divide in half and wrap each half in plastic and refrigerate for at least half an hour.
  3. Heat the oven to 375 degrees. Roll out one half of the dough to an even 1/8" thickness between 2 large sheets of parchment paper. Slide the rolled tough, still on the parchment, onto a baking sheet and refrigerate until firm, about 10 minutes. Meanwhile, repeat with the rest of the dough.
  4. Cut out the cookies with a 2" round cookie cutter and transfer to a parchment paper-lined baking sheet. Bake for 8 to 10 minutes, rotating the sheet halfway through, until the cookies are golden brown. Roll out the the remaining dough, sprinkle the sugar over the dough, and use a 3/4" round cookie cutter to cut out the centers of the rounds. Bake as before.
  5. When the cookies have cooled, add about 1 tsp of jam on the base cookies and put the cut-out cookies on top. Let stand until set, about 30 minutes.

Secret bonus song I made on my Kaossilator while making these this weekend:

Saturday, October 9, 2010

Mussamun Curry Paste


My brother and his wife got me a great curry cookbook for Christmas a few years ago, and after opening it up the other day, I got hungry for some labor-intensive Indian food. In the back are a few recipes for curry paste (red, green, yellow) and one for "Thai-Style Mussamun Curry Paste" that serves as a base for an interesting curry containing chicken, potatoes, and peanuts. After looking at the ingredient list I knew I had to make it.


This paste has a bunch of sweet spices and an undercurrent of a kick from the dried chiles. Apparently it some ceremonial purposes in Thailand (weddings, births, ordinations of Buddhist monks), and it tastes pretty incredible. All the up-front work you put in pays off, since making homemade curry is so quick with some curry paste on hand. I happend to have all the whole spices (except for the turmeric), so I went overkill: here's a photo of some cardamom pods I cracked open, just to give you an idea of how far you can take this recipe if you're in the mood.


The Mussamun curry recipe in this cookbook calls for 2 cans of coconut milk, 2 lbs cut up chicken breast, 1 large peeled, chopped potato, and 1 onion cut into chunks, along with 1/2 c dry-roasted salted peanuts, 2 Tbsp brown sugar, 3 Tbsp dissolved tamarind paste, 2 Tbsp lime juice, and salt to taste. Combine 5 Tbsp curry paste with 1/2 c of coconut milk over medium-high heat, lightly brown the chicken, then add everything else besides the lime juice. Bring to a boil, simmer for 15 to 20 minutes, add the lime juice, and serve with basmati rice. FYI, I also made this with a couple of blocks of cubed, pan-fried extra firm tofu (frozen overnight, thawed during the day, and hand-squeezed dry), adding the tofu a few minutes before taking the curry off the heat, and it was at least as good as the original recipe.


Thai-Style Mussamun Curry Paste
    Ingredients
  • 15 small dried red chili peppers (chiles de arbol, the slender ones about the size of your pinkie)
  • 2 tsp ground cumin
  • 1 tsp ground coriander
  • 1 tsp ground black pepper
  • 1 tsp ground nutmeg
  • 1 tsp ground cardamom
  • 1/2 tsp ground cloves
  • 1/2 tsp ground turmeric
  • 2 tsp salt
  • 1/2 c coarsely chopped onion
  • 1/2 c chopped garlic
  • 3 Tbsp minced fresh lemongrass (the white sections of about 3 stalks)
  • 1 tbsp minced fresh ginger
  • few Tbsp water
    Directions
  1. Stem the chilies, remove the seeds, and cut them into small pieces using kitchen shears. There will be about 1/4 c of dried chilies. Place in a small bowl and add warm water to cover, then soak for about 15 minutes. Drain and set aside.
  2. Meanwhile, combine cumin and coriander seds in a small, dry frying pan. Toast over medium heat for 1 to 2 minutes, stirring often, until fragrant and slightly darkened. Remove from heat and combine with the rest of the spices. In a food processor, combine the onion, garlic, lemongrass, ginger, 2 Tbsp of water, drained chilies, and the spice mixture. Process to a fairly smooth, evenly colored-paste.
  3. Transfer to an airtight jar and seal. Refrigerate until needed for up to 1 months, or freeze for up to 6 months.

Tuesday, August 3, 2010

Indian Skillet Black-Eyed Peas


Ever since my awesome friends Erik and Kelly turned me on to Moosewood Restaurant's New Classics cookbook I have been cooking from it compulsively. Every single recipe, except for one bland potato/pasta/pesto dish, has been a showstopper. This recipe for spiced black-eyed peas is one of my favorites.


Like most fun recipes, this one has a couple of secret ingredients: tamarind paste, which is pretty easy to find in a Whole Foods/co-op/ethnic grocery, and ground cardamom. It's definitely a little more effort to buy cardamom pods, pound them open, fish out the flavor crystals, and grind them by hand, but it smells and tastes amazing. You know that moment when you throw a bunch of spices into a pan of hot oil and onion and garlic? This recipe dials that moment up to 10.


I really went overboard with my favorite spices, easily doubling the amount of fresh ginger and cardamom. Any way you make it, this recipe has an amazing flavor profile and is one of the most satisfying bean dishes I've ever made. Score another one for Moosewood!

Ingredients
  • 2 Tbsp vegetable oil
  • 1 c chopped onions
  • 1 clove garlic, minced
  • 1 Tbsp minced fresh ginger
  • 1/4 tsp cayenne
  • 1/4 tsp ground cinnamon
  • 1/4 tsp ground cardamom
  • 1/4 tsp ground coriander
  • 1 tsp salt
  • 1 tsp tamarind concentrate, dissolved in 1 c warm water
  • 3 c cooked black-eyed peas (equal to two 16 oz cans, rinsed and drained)
  • 1/2 c chopped fresh tomatoes
  • 2 c rinsed and chopped fresh spinach

Directions
  1. Heat the oil over medium-high heat in a large skillet or nonreactive saucepan. Add the onions and garlic and saute on medium-high heat until the onions are soft and beginning to brown, about 10 minutes.
  2. Add the ginger, cayenne, cinnamon, cardamom, coriander, and salt and mix well. Stir in the water and tamarind and black eyed peas, cover, and simmer for about 10 minutes.
  3. Add the tomatoes and spinach and cook just until the spinach wilts, about 1 minute. Serve immediately.

Tuesday, June 29, 2010

Strawberries, Two Ways


Strawberry Shortcakes, c/o Baking Illustrated

A few weeks ago, at the height of strawberry season, I was eating strawberries with everything (especially Greek yogurt). This having been my first strawberry season with my new copy of Baking Illustrated in hand, I knew I had to make their strawberry shortcakes. They turned out great - slightly sweetened biscuits, mascerated strawberries, a generous portion of whipped cream - just about everything you'd want. Thankfully, my obsession didn't stop there.


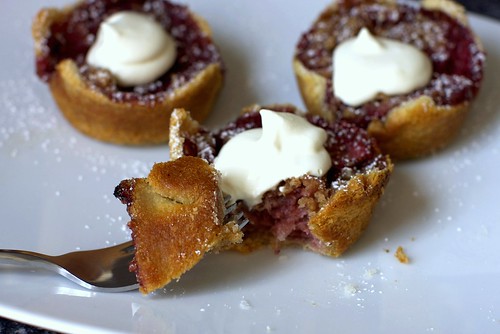
Strawberry Brown Butter Bettys, c/o Smitten Kitchen

Just as this unbelievably delicious and easy banana bread cobbler recipe rendered banana bread obsolete, the strawberry brown butter bettys on smittenkitchen.com were so perfect that I'll probably never make strawberry shortcakes again. Still, both of these recipes are well worth your time.

    Fruit
  • 8 c strawberries, hulled
  • 6 Tbsp sugar
    Shortcakes
  • 2 c (10 oz) AP flour
  • 5 Tbsp sugar
  • 1 Tbsp baking powder
  • 1/2 tsp salt
  • 8 Tbsp cold unsalted butter, cut into 1/2-in cubes
  • 1 egg, lightly beaten
  • 1/2 c plus 1 Tsbp half-and-half or whole milk
  • 1 egg white, lightly beaten
  • 2 c whipped cream (+ 1 tsp vanilla)
    Directions
  1. For the fruit: Crush 3 cups of the hulled strawberries with a potato masher. Slice the remaining 5 cups of berries and stir into the crushed berries, along with the sugar. Set the fruit aside and mascerate for at least 30 minutes and up to 2 hours.
  2. For the shortcakes: Set an oven rack to the lower-middle position and preheat to 425 degrees. Pulse the flour, 3 Tbsp of the sugar, baking powder, and salt in a food processor. Scatter the cold butter over the dry ingredients and pulse until it resembles coarse meal, about fifteen 1-second pulses. Transfer to a medium bowl.
  3. Mix the beaten egg and half and half in a mesuring cup. Add the egg mixture to the dry ingredients and mix until large clumps are formed. Turn onto a floured work surface and lightly knead until combined.
  4. Pat the dough until a 9"x6" rectangle, about 3/4" thick, making sure not to overwork the dough. Cut out 6 dough rounds with a 2 3/4" biscuit cutter. Brush with beaten egg white, and sprinkle with remaining sugar.
  5. Bake until golden brown, 12 to 14 minutes. Place the baking sheet on a wire rack and cool until warm, about 10 minutes.
  6. Split each shortcake, portion fruit over the bottom, add a dollop of whipped cream, and cap with the cake top.

Sunday, March 28, 2010

Udon with Shiitake Mushrooms and Kale in Miso Broth


I'm just getting over being sick for a full month, and when I'm sick I crave Japanese food. I wish I had found this recipe when I was just coming down with the plague. It's cheap, comforting, easy, and incredibly satisfying. It's also arguably the healthiest thing I've ever made in the kitchen.


This recipe comes from the venerable Veganomicon and features red miso, which magically enhances any broth-y entree.


Since I live alone, I bought all the ingredients, prepped the onions and mushrooms, set half of them aside, and cooked a half recipe two days in a row. Fresh udon noodles should be available at any halfway-fancy grocery store - in fact, I've never seen dried udon noodles, so fresh noodles may be easier to find. I also at least doubled the amount of fresh ginger in this recipe, but your ginger threshold may not be as high as mine.


    Ingredients
  • 1/2 lb fresh or dried udon noodles
  • 2 Tbsp vegetable oil
  • 1 medium red onion, sliced into thin half-moons
  • 4 oz shiitake mushrooms, rinsed, stems trimmed, sliced
  • 3 cloves garlic, minced
  • 2 tsp ginger, minced
  • 2 Tbsp mirin (optional)
  • 2 cups water
  • 3 Tbsp miso (preferably red, if using light add another Tbsp)
  • 4 c chopped kale
  • 2 tsp soy sauce
    Directions
  1. Bring a pot of water to a boil and cook the udon per the directions. Fresh udon will take about 2 min. Drain, rinse with cool water, and set aside.
  2. Saute the onion and mushrooms in the oil over medium heat for 5 minutes. Add the garlic and ginger and saute for another minute.
  3. Add the mirin, water, soy sauce, and miso, and bring to a gentle boil. Reduce the heat and add the kale. Toss with tongs until kale has wilted, about a minute.
  4. Add the noodles, toss again, and serve.

Monday, November 23, 2009

Molasses Spice Cookies, etc.


Somebody got me a beautiful new copy of Baking Illustrated for my birthday, and last week I was really in the mood for some kind of molasses-y, spice-y cookie. Lo and behold, I found a promising recipe for "Molasses Spice Cookies" on page 442. The Cook's Illustrated StoryTM that prefaces this recipe is hilarious. They explain how to get the "tooth-sinking" texture and just the right amount of cracking on the tops of the cookies, but when they go into how they perfected the flavors, they really get into it. I can't read this and not hear Will Ferrell reading it aloud.
A teaspoon of vanilla extract complemented generous amounts of sharp, spicy ground ginger and warm, soothing cinnamon. Cloves, rich and fragrant, and allspice, sweet and mysterious, were added, but in more judicious quantities. Nutmeg was pedestrian and had little to offer. Finely and freshly ground black pepper, however, added some intrigue -- a soupçon of heat against the deep, bittersweet flavor of the molasses.
Anyway, these are incredibly good cookies, and they're best served warm with some ginger ice cream. I have to admit, they were right about the black pepper.

Molasses Spice Cookies
  • 2 1/4 cups (11 1/4 oz) unbleached all-purpose flour
  • 1 tsp baking soda
  • 1 1/2 tsp freshly ground cinnamon
  • 1 1/2 tsp ground ginger
  • 1/2 tsp freshly ground cloves
  • 1/4 tsp ground allspice
  • 1/4 tsp finely ground black pepper
  • 1/4 tsp salt
  • 12 Tbsp unsalted butter, softened but cool
  • 1/3 cup packed (2 1/3 oz) dark brown sugar
  • 1/3 cup (2 1/3 oz) granulated sugar
  • 1 large egg yolk
  • 1 tsp vanilla extract
  • 1/2 cup light or dark molasses
  • 1/2 cup raw sugar
Instructions
  1. Place the oven rack in the middle position and heat the oven to 375.
  2. Whisk the flour, baking soda, spices, and salt until thoroughly combined.
  3. Beat the butter and brown/granulated sugars at medium-high speed until light and fluffy, about 3 minutes. Reduce speed to medium, add the yolk and vanilla, and mix for 20 seconds. Add the molasses and mix for 20 seconds. Reduce speed to low, add the flour mixture, and mix until just incorporated. Scrape the bowl between each addition.
  4. Break off heaping Tbsp chunks of dough, roll into 1 1/2 inch balls, and roll in the raw sugar. Set on parchment paper-lined baking sheet with a couple inches to spare between the cookies.
  5. Bake until puffy and the edges have just begun to set, about 11 minutes, rotating the pan after 6 minutes. Let cool for 5 minutes before transferring to a cooling rack.

I also made a pig pickin' cake for my friend's birthday, and I used a good ol' fashioned 9x13 baking pan, not those fancy pants cake rounds. The ingredients speak for themselves. It was real good.


Y'all, today we're gonna make some peanut butter balls.

Wednesday, September 30, 2009

Bittersweet Chocolate Pudding Pie with Crème Fraîche Topping


A few weeks ago I came across a recipe for chocolate pudding pie, and in the comments I found a much more complicated recipe from Bon Appétit. Guess which one I made?

This pie was exactly what I hoped it would be. It was cool and refreshing, especially with the tangy crème fraîche topping, and the cookie crumb/hardened chocolate crust was the perfect base. I adjusted the crust recipe a bit, since there wasn't quite enough of it as it was written. It also took way longer than 12 minutes to get the crust to that "dry" point, so keep an eye on it. As always, my preferred method of "finely chopping" bars of chocolate is to bash them with my rolling pin while they're still in the wrapper. When you distribute the chocolate over the crust, don't be as impatient as I was and wait a full two minutes before spreading the melted chocolate around.

As it turns out, you can easily make your own crème fraîche. Add a tablespoon of cultured buttermilk to a cup of heavy cream (both at room temperature), partially cover, and let stand at room temperature about 24 hours, or until thickened. Stir and refrigerate at least 24 hours before using. I made this at home, forgetting I had a carton of store-bought crème fraîche, but I tried both and they were pretty much indistinguishable. The cream will keep about 2 weeks in the refrigerator.

    Crust
  • 1 1/2 cups chocolate wafer cookie crumbs
  • 3 tablespoons sugar
  • 7 1/2 tablespoons unsalted butter, melted
  • 3 ounces bittersweet chocolate (60% cacao), finely chopped

    Filling
  • 1/3 cup sugar
  • 1/3 cup unsweetened cocoa powder
  • 2 tablespoons cornstarch
  • 1/8 teaspoon salt
  • 1 3/4 cups whole milk, divided
  • 1/4 cup heavy whipping cream
  • 4 ounces bittersweet chocolate (60% cacao), finely chopped
  • 1 tablespoon dark rum
  • 1 teaspoon vanilla extract

    Topping
  • 1 cup chilled crème fraîche*
  • 1 cup chilled heavy whipping cream
  • 1/4 cup sugar
  • 1 teaspoon vanilla extract

For the crust: Position rack in center of oven; preheat to 350°F. Blend cookie crumbs and sugar in processor. Add melted butter; process until crumbs are evenly moistened. Press crumb mixture onto bottom and up sides (not rim) of 9-inch-diameter glass pie dish. Bake until crust begins to set and no longer looks moist, pressing gently with back of fork if crust puffs, about 15 minutes. Remove crust from oven, then sprinkle chopped chocolate over bottom of crust. Let stand until chocolate softens, 1 to 2 minutes. Using offset spatula or small rubber spatula, spread chocolate over bottom and up sides of crust to cover. Chill crust until chocolate sets, about 30 minutes.

For the filling: Whisk sugar, cocoa, cornstarch, and salt to blend in heavy medium saucepan. Gradually add 1/3 cup milk, whisking until smooth paste forms. Whisk in remaining milk, then 1/4 cup cream. Using flat-bottom wooden spoon or heatproof spatula, stir mixture constantly over medium heat, scraping bottom and sides of pan until pudding thickens and begins to bubble at edges, about 5 minutes. Add chocolate; stir until mixture is smooth. Remove from heat; stir in rum and vanilla. Pour hot pudding into crust and spread evenly. Cool 1 hour at room temperature. Cover with plastic wrap; chill overnight.

For the topping: Using electric mixer, beat crème fraîche, whipping cream, sugar, and vanilla in medium bowl just until stiff peaks form and mixture is thick enough to spread (do not overbeat or mixture may curdle). Spread topping decoratively over top of pie, swirling to create peaks, if desired.

Thursday, September 17, 2009

Blueberry Buckle


So I bought a bunch of blueberries thinking I was going to make another blueberry coffee cake, but I ended up making this one and I'm glad I did. After checking Cook's Illustrated I realized I'd never made (or heard of) a buckle, so I gave it a shot. A buckle is basically a coffee cake, and this was definitely the best buckle/coffee cake I've ever made. The blueberries, lemon zest and cinnamon go perfectly together.

The recipe only makes a little bit of dough, and I couldn't believe that a whole quart of blueberries could be folded into it, but somehow it worked out. It also took forever to bake -- more like 75 minutes than 55 -- and it could have gone longer, since the bottom was a bit gummy. I'd say give it another few minutes once a tester comes out clean.


    Streusel
  • 1/2 cup unbleached all-purpose flour (2 1/2 ounces)
  • 1/2 cup packed light brown sugar (3 1/2 ounces)
  • 2 tablespoons granulated sugar
  • 1/4 teaspoon ground cinnamon
  • Pinch table salt
  • 4 tablespoons unsalted butter (1/2 stick), cut into 8 pieces, softened but still cool

    Cake
  • 1 1/2 cups unbleached all-purpose flour ( 7 1/2 ounces)
  • 1 1/2 teaspoons baking powder
  • 10 tablespoons unsalted butter (1 1/4 stick), softened but still cool
  • 2/3 cup granulated sugar (about 4 3/4 ounces)
  • 1/2 teaspoon table salt
  • 1/2 teaspoon grated lemon zest
  • 1 1/2 teaspoons vanilla extract
  • 2 large eggs, room temperature
  • 4 cups fresh blueberries (about 20 ounces), picked over

  1. For the streusel: In standing mixer fitted with flat beater, combine flour, sugars, cinnamon, and salt on low speed until well combined and no large brown sugar lumps remain, about 45 seconds. Add butter and mix on low until mixture resembles wet sand and no large butter pieces remain, about 2 1/2 minutes. Transfer streusel to small bowl and set aside.
  2. For the cake: Adjust oven rack to lower-middle position; heat oven to 350 degrees. Spray 9-inch round cake pan with 2-inch sides with nonstick cooking spray, line bottom with parchment or waxed paper round, and spray round; dust pan with flour and knock out excess.
  3. Whisk flour and baking powder in small bowl to combine; set aside. In standing mixer fitted with flat beater, cream butter, sugar, salt, and lemon zest at medium-high speed until light and fluffy, about 3 minutes; using rubber spatula, scrape down bowl. Beat in vanilla until combined, about 30 seconds. With mixer running at medium speed, add eggs one at a time; beat until partially incorporated, then scrape down bowl and continue to beat until fully incorporated (mixture will appear broken). With mixer running on low speed, gradually add flour mixture; beat until flour is almost fully incorporated, about 20 seconds. Disengage bowl from mixer; stir batter with rubber spatula, scraping bottom and sides of bowl, until no flour pockets remain and batter is homogenous; batter will be very heavy and thick. Using rubber spatula, gently fold in blueberries until evenly distributed.
  4. Transfer batter to prepared pan; with rubber spatula, using a pushing motion, spread batter evenly to pan edges and smooth surface. Squeeze handful of streusel in hand to form large cohesive clump; break up clump with fingers and sprinkle streusel evenly over batter. Repeat with remaining streusel. Bake until deep golden brown and toothpick or wooden skewer inserted into center of cake comes out clean, about 55 minutes. Cool on wire rack 15 to 20 minutes (cake will fall slightly as it cools).
  5. Run paring knife around sides of cake to loosen. Place upside-down plate (do not use plate or platter on which you plan to serve the cake) on top of cake pan; invert cake to remove from pan, lift off cake pan, then peel off and discard parchment. Re-invert cake onto serving platter. Cool until just warm or to room temperature, at least 1 hour. Cut into wedges and serve.

Sunday, August 9, 2009

Peach Cobbler


My landlords got a big box of peaches from the farm this week and unloaded a bunch on me, so naturally I signed into Cook's Illustrated and searched for "peaches". They started with one of their archetypal problem statements:
"Bad peaches, soggy biscuits, and syrupy filling were just three of the problems we had to solve in resurrecting this simple summer dessert."
My peaches were a bit overripe, so I blanched them to speed up the peeling step, then I drew out some moisture by soaking them in sugar for half an hour. Combining a portion of the peach juice with some cornstarch or arrowroot and lemon juice thickens the syrup and brightens the flavor of the peaches. I made some very simple biscuits and placed them on the peaches after they had baked for about 10 minutes. I'm not the biggest fruit dessert fan, but I loved this cobbler. It's easy and flexible. (I had to use Greek yogurt, because I didn't have any whole-milk yogurt on hand, and it worked fine.) Next time I'll have some vanilla ice cream.


    Filling
  • 2 1/2 pounds peaches , ripe but firm (6 to 7 medium)
  • 1/4 cup granulated sugar (1 3/4 ounces)
  • 1 teaspoon cornstarch
  • 1 tablespoon lemon juice from 1 lemon
  • pinch table salt

    Biscuit Topping
  • 1 cup unbleached all-purpose flour (5 ounces)
  • 3 tablespoons granulated sugar
  • 3/4 teaspoon baking powder
  • 1/4 teaspoon baking soda
  • 1/4 teaspoon table salt
  • 5 tablespoons unsalted butter (cold), cut into cubes
  • 1/3 cup plain whole-milk yogurt
  • 1 teaspoon granulated sugar

  1. Adjust oven rack to lower-middle position and heat oven to 425 degrees. Cube the butter and hold in the freezer while preparing the peaches and biscuits.
  2. For the filling: Peel peaches, then halve and pit each. Using small spoon, scoop out and discard dark flesh from pit area. Cut each half into wedges. Gently toss peaches and sugar together in large bowl; let stand for 30 minutes, tossing several times. Drain peaches in colander set over large bowl. Whisk 1/4 cup of drained juice (discard extra), cornstarch, lemon juice, and salt together in small bowl. Toss peach juice mixture with peach slices and transfer to 8-inch-square glass baking dish. Bake until peaches begin to bubble around edges, about 10 minutes.
  3. For the topping: While peaches are baking, in food processor, pulse flour, 3 tablespoons sugar, baking powder, baking soda, and salt to combine. Scatter butter over and pulse until mixture resembles coarse meal, about ten 1-second pulses. Transfer to medium bowl; add yogurt and toss with rubber spatula until cohesive dough is formed. (Don't overmix dough or biscuits will be tough.) Break dough into 6 evenly sized but roughly shaped mounds and set aside.
  4. To assemble and bake: After peaches have baked 10 minutes, remove peaches from oven and place dough mounds on top, spacing them at least 1/2 inch apart (they should not touch). Sprinkle each mound with portion of remaining 1 teaspoon sugar. Bake until topping is golden brown and fruit is bubbling, 16 to 18 minutes. Cool cobbler on wire rack until warm, about 20 minutes; serve.

Sunday, November 25, 2007

Pumpkin Chocolate Chip Cupcakes, Hot Sauce-Glazed Tempeh

Not that these are supposed to go together, but they were both pretty tasty. I made the cupcakes a few weeks ago for my friend's post-marathon dinner potluck. She's one of the most athletic people I know but inexplicably this was her first race ever. She's also a gourmand (although she's eaten fromage de tête), so the potluck was great. The cupcakes weren't as good as the maple pie but they were alright -- nothing special. The frosting was fun though.
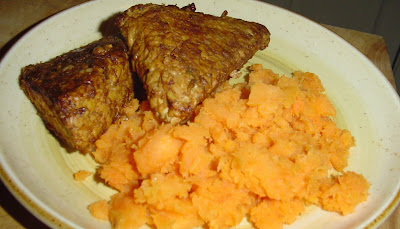
The hot sauce-glazed tempeh, courtesy of Isa's new tome, was awesome. Apparently the secret to tempeh is to boil it before doing anything with it. All that weird fishiness gets cooked off, and when you're marinating it in Valentina you're guaranteed it's going to be delicious. It was perfect with some mashed sweet potato (de-veganized with some dairy butter).